Setting up an L2TP (Layer 2 Tunneling Protocol) VPN on your iPhone or iPad iMac & Macbook involves a few simple steps. Here’s a step-by-step guide:
Note: Before proceeding, make sure you have the necessary information from your VPN provider, including the server address, your VPN username, and password.
Setting Up L2TP VPN on iPhone:
- Open Settings: Open the “Settings” app on your iPhone.
- Go to General: Scroll down and tap on “General.”
- VPN Settings: Find and tap on “VPN” or “VPN Settings.”
- Add VPN Configuration: Tap on “Add VPN Configuration.”
- Select L2TP: Under the VPN Type, select “L2TP.”
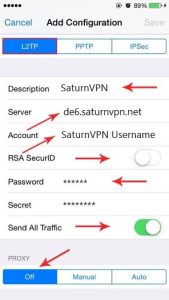
- Configure VPN: Fill in the required information:
- Description: Give your VPN a name (e.g., My VPN).
- Server: Enter the server address provided by your VPN provider.
- Account: Enter your VPN username.
- Password: Enter your VPN password.
- Secret: Some VPN providers might require a secret key. Enter it if provided.
- Save Configuration: Tap on “Save” in the upper right corner.
- Connect to VPN: After saving the configuration, you will see your VPN listed under “VPN” in the Settings. Tap on the VPN you just created.
- Turn on VPN: Toggle the switch to turn on the VPN. You might be prompted to enter your passcode or use Touch ID/Face ID.
- Connected: Once connected, you’ll see a VPN icon in the status bar at the top of your iPhone screen.
Congratulations! Your iPhone is now connected to the L2TP VPN. Keep in mind that some VPN providers might have specific settings or additional steps, so it’s always a good idea to check their documentation or contact their support for assistance.